
BB-I #1302
Straight Jump with ½ turn (180°) in
flight phase to stand
flight phase to stand

BB-I #1303
Two flying flairs


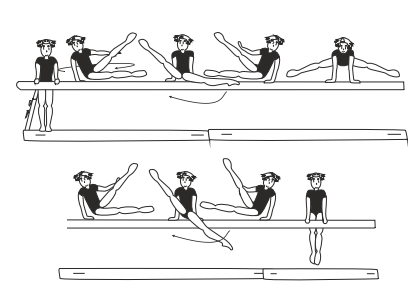
BB-I #1304
Straddle pike jump bwd over beam
from round-off into immediate hip
circle bwd – 90° approach to beam
from round-off into immediate hip
circle bwd – 90° approach to beam

BB-I #1305
Free jump to cross split sit
take-off from two fee
take-off from two fee


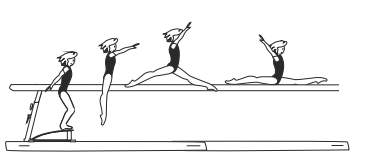
BB-I #1305 (b)
Change leg leap to free cross split
sit – diagonal approach to beam
sit – diagonal approach to beam


BB-I #1308
Jump with ½ turn (180°) over
shoulder to neck stand, 1/1 or
1½ turn (360° - 540˚) to neck stand
shoulder to neck stand, 1/1 or
1½ turn (360° - 540˚) to neck stand


BB-I #1308 (b)
Jump with ½ turn (180°) over
shoulder to neck stand, 1/1 or
1½ turn (360° - 540˚) to neck stand
shoulder to neck stand, 1/1 or
1½ turn (360° - 540˚) to neck stand


BB-I #1309
From cross stand facing end of
beam – head kip
beam – head kip


BB-I #1309 (b)
From cross stand facing end of
beam – jump to hstd with hip angle
(pike) to front walkover
beam – jump to hstd with hip angle
(pike) to front walkover


BB-I #1309 (c)
From cross stand facing end of
beam – jump to hstd with hip angle
(pike) to handspring fwd with
step-out or land on 2 feet
beam – jump to hstd with hip angle
(pike) to handspring fwd with
step-out or land on 2 feet


BB-I #1309 (d)
From cross stand facing end of
beam – jump to hstd with hip angle
(pike) to handspring fwd with
step-out or land on 2 feet
beam – jump to hstd with hip angle
(pike) to handspring fwd with
step-out or land on 2 feet


BB-I #1310
Jump, press, or swing to cross or
side hstd with 1/1 - 1½ turn
(360°- 540°) – lower to end
position touching beam
side hstd with 1/1 - 1½ turn
(360°- 540°) – lower to end
position touching beam


BB-I #1310 (b)
Jump, press, or swing to cross or
side hstd with 1/1 - 1½ turn
(360°- 540°) – lower to end
position touching beam
side hstd with 1/1 - 1½ turn
(360°- 540°) – lower to end
position touching beam


BB-I #1310 (c)
Jump, press, or swing to cross or
side hstd with 1/1 - 1½ turn
(360°- 540°) – lower to end
position touching beam
side hstd with 1/1 - 1½ turn
(360°- 540°) – lower to end
position touching beam


BB-I #1311
Jump with stretched hips to
planche (2 sec.)
planche (2 sec.)


BB-I #1311 (b)
Jump, press, or swing to hstd –
lower to planche (2 sec.),
also with ½ turn (180°) in hstd
lower to planche (2 sec.),
also with ½ turn (180°) in hstd


BB-I #1311 (c)
Jump, press, or swing to hstd –
lower to clear pike support with
legs together (2 sec.),
also with ½ turn (180°) in hstd
lower to clear pike support with
legs together (2 sec.),
also with ½ turn (180°) in hstd


BB-I #1311 (d)
From hstd (2 sec.) release one
hand with swing down swd to rear
support;
also with ½ turn (180°) in hstd
hand with swing down swd to rear
support;
also with ½ turn (180°) in hstd


BB-I #1312
Hstd in cross position with large
arch span, also piked with one leg
vertical, other leg bent (2 sec.)
- lower to optional end position
arch span, also piked with one leg
vertical, other leg bent (2 sec.)
- lower to optional end position


BB-I #1312 (b)
Hstd in cross position with large
arch span, also piked with one leg
vertical, other leg bent (2 sec.)
- lower to optional end position
arch span, also piked with one leg
vertical, other leg bent (2 sec.)
- lower to optional end position

BB-I #1312 (c)
Hstd with horizontal leg hold
(2 sec.) – reverse planche in
different variations - lower to
optional end position
(2 sec.) – reverse planche in
different variations - lower to
optional end position


BB-I #1312 (d)
Hstd with horizontal leg hold
(2 sec.) – reverse planche in
different variations - lower to
optional end position
(2 sec.) – reverse planche in
different variations - lower to
optional end position


BB-I #1313
Jump, press, or swing to hstd shift
weight to one arm hstd (2 sec.)
– lower to optional end position
weight to one arm hstd (2 sec.)
– lower to optional end position


BB-I #1313 (b)
Jump, press, or swing to hstd shift
weight to one arm hstd (2 sec.)
– lower to optional end position
weight to one arm hstd (2 sec.)
– lower to optional end position


BB-I #1313 (c)
Jump, press, or swing to hstd shift
weight to one arm hstd (2 sec.)
– lower to optional end position
weight to one arm hstd (2 sec.)
– lower to optional end position


BB-I #1314
Jump with ¼ turn (90°) and
extended hips through a
momentary hstd on one arm with
immediate ¼ turn (90°) and
support on second arm to side
hstd – lower to optional end
position
- 90° approach to beam
extended hips through a
momentary hstd on one arm with
immediate ¼ turn (90°) and
support on second arm to side
hstd – lower to optional end
position
- 90° approach to beam


BB-I #1314 (b)
From rear stand (back towards
beam), flic flac over beam to
candle position, ending in front
support
beam), flic flac over beam to
candle position, ending in front
support


BB-I #1314 (c)
From rear stand (back towards
beam), flic flac with ½ turn (180°)
to candle position, ending in front
support (grasping under the beam
with both hands)
beam), flic flac with ½ turn (180°)
to candle position, ending in front
support (grasping under the beam
with both hands)


BB-I #1315
Free (aerial) walkover fwd to rear
support – or with ¼ turn (90°) to
cross sit on thigh – 90° approach
to beam
support – or with ¼ turn (90°) to
cross sit on thigh – 90° approach
to beam


BB-I #1315 (b)
Free (aerial) walkover fwd to rear
support – or with ¼ turn (90°) to
cross sit on thigh – 90° approach
to beam
support – or with ¼ turn (90°) to
cross sit on thigh – 90° approach
to beam


BB-I #1317
Round-off at end of beam – flic-flac
through hstd with swing down to
cross straddle sit
through hstd with swing down to
cross straddle sit